Creating beautiful nail art doesn’t always require professional tools or expensive kits. You can achieve salon-worthy designs right at home with just a few household items! Whether you’re a nail art beginner or a seasoned DIY enthusiast, there are countless ways to use everyday items to elevate your nail game. In this post, we’ll explore creative nail art hacks using items you likely already have at home. These tips and tricks are perfect for women in the USA and Canada who want to add a personal touch to their nails without breaking the bank.
Why Use Household Items for Nail Art?
Using household items for nail art is not only cost-effective but also incredibly convenient. You don’t need to spend money on specialized tools or make frequent trips to the salon. Plus, many of these items allow for creative flexibility, enabling you to experiment with different patterns, textures, and techniques that you might not achieve with traditional nail tools.
Nail Art Hacks Using Household Items
Here are some fantastic nail art hacks using common household items. These hacks are easy to follow and can help you create intricate designs with minimal effort.
1. Toothpicks for Precision Dots and Lines
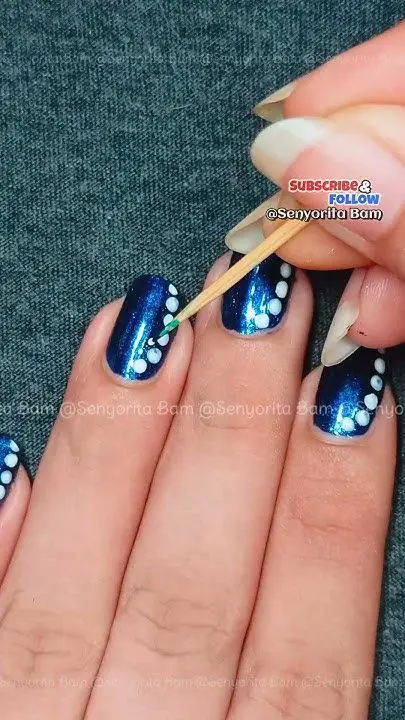
What You Need: Toothpicks
How to Use: Toothpicks are perfect for creating small dots and fine lines. Simply dip the tip of a toothpick into nail polish and gently press it onto your nails to create dots. For lines, drag the toothpick lightly across the nail surface. This hack is great for creating polka dot designs or intricate detailing on your nails.
Pro Tip: Use multiple toothpicks for different colors to avoid mixing polish on a single stick.
2. Tape for Crisp Lines and Geometric Designs
What You Need: Scotch tape or masking tape
How to Use: Tape is an excellent tool for creating clean, straight lines or geometric shapes on your nails. Apply a base coat and let it dry completely. Then, cut pieces of tape into your desired shapes or strips and place them on your nails. Paint over the exposed areas with a different color, and once the polish is dry, carefully peel off the tape to reveal sharp lines or patterns.
Pro Tip: Ensure the base coat is thoroughly dry before applying tape to prevent it from peeling off.
3. Sponge for Gradient or Ombre Effects
What You Need: Makeup sponge or kitchen sponge
How to Use: Sponges are ideal for creating gradient or ombre effects on nails. Paint two or more colors in horizontal stripes on a flat surface or directly onto the sponge. Gently press the sponge onto your nails, rolling it slightly to blend the colors. Repeat until you achieve the desired intensity.
Pro Tip: Use a latex-free sponge to avoid allergic reactions and to get a smooth, even application.
4. Bobby Pins for Perfect Polka Dots
What You Need: Bobby pins
How to Use: Bobby pins are a great alternative to dotting tools. Simply straighten a bobby pin, dip the rounded end into nail polish, and press it onto your nails to create dots. This hack is perfect for achieving consistent dot sizes for polka dot designs.
Pro Tip: For smaller dots, use the tip of the bobby pin’s prong instead of the rounded end.
5. Cotton Swabs for Marbling Effects
What You Need: Cotton swabs (Q-tips)
How to Use: To create a marbled effect, apply a few drops of different colored nail polishes onto your nails. While the polish is still wet, use the tip of a cotton swab to gently swirl the colors together, creating a marbled look.
Pro Tip: Use a fresh cotton swab for each nail to avoid mixing colors too much and muddying the design.
6. Plastic Wrap for Unique Textures
What You Need: Plastic wrap or cling film
How to Use: For a textured or crackle effect, apply a base color and let it dry. Then, paint a second color over the top. While the second coat is still wet, crumple a small piece of plastic wrap and press it lightly onto the nail to create a unique texture.
Pro Tip: Experiment with different colors and pressing techniques to achieve various effects.
7. Straws for Splatter Art
What You Need: Drinking straws
How to Use: Cut a straw into several pieces, one for each color you plan to use. Dip one end of the straw into the polish, then blow through the other end to splatter paint onto your nails. This creates a fun, messy splatter effect perfect for abstract nail art.
Pro Tip: Cover your work area and fingers with newspaper or paper towels to avoid making a mess.
8. Sharpie Markers for Easy Nail Art
What You Need: Sharpie markers or any fine-tipped permanent markers
How to Use: Sharpie markers can be used to draw designs directly onto your nails. After applying a base coat and color, use the marker to create designs like flowers, stripes, or even intricate patterns. Seal your design with a top coat to prevent smudging.
Pro Tip: Use a white or metallic Sharpie on dark nail polish for a striking contrast.
9. Dental Floss for Striped Designs
What You Need: Dental floss or floss picks
How to Use: Wrap dental floss around your nail or use floss picks to create lines and stripes. After painting your nails with a base color and allowing them to dry, use the floss to paint thin lines with a contrasting color.
Pro Tip: Use mint-flavored dental floss for an added scent bonus while creating your designs!
10. Old Eyeshadow for Custom Nail Polish Colors
What You Need: Old eyeshadow or loose pigments, clear nail polish
How to Use: Crush old eyeshadow or loose pigments into a fine powder and mix it with clear nail polish to create a custom nail color. Use a toothpick to stir the mixture thoroughly, and apply it to your nails like regular polish.
Pro Tip: Experiment with different colors and glitters to create unique shades and effects.
Additional Tips for Nail Art Success
- Clean Your Tools Regularly: Whether you’re using household items or professional tools, keeping them clean will ensure precise application and prevent color mixing.
- Use a Steady Hand: Rest your hand on a flat surface while applying designs to reduce shaking and maintain control.
- Be Patient: Allow each layer of polish to dry fully before moving on to the next step to avoid smudging and achieve crisp lines and designs.
- Seal Your Design: Always finish with a top coat to protect your nail art and extend its longevity.
Conclusion
With a little creativity and some household items, you can easily create beautiful nail art designs right at home. These nail art hacks are perfect for women in the USA and Canada looking to express their style without the need for expensive tools or salon visits. From using toothpicks for fine lines to creating ombre effects with a sponge, the possibilities are endless. So go ahead and raid your kitchen or bathroom drawers and start experimenting with these fun and easy nail art ideas today!
For more nail art inspiration and DIY beauty tips, be sure to follow our blog. Happy painting!